TSLとWebGPUでのGPGPUパーティクル
このレッスンでは、Three Shading Language(TSL)とWebGPUを使用して、3Dモデルや3Dテキストをレンダリングする数十万の浮遊するパーティクルを作成します。
フェイスの代わりに、大量のパーティクルを使用し、これにより、異なるモデル間をスムーズにトランジションさせることができます。
GPGPUパーティクルでレンダリングされたキツネ、書籍、3Dテキストの3Dモデル! 🚀
GPGPUパーティクルシステム
コードに入る前に、GPGPUとは何か、Three.jsでどのように利用できるかを理解しましょう。
GPGPUとは?
GPGPU(General-Purpose computing on Graphics Processing Units)とは、通常CPUが処理する演算を、GPUの並列処理能力を活用して実行する技術です。
Three.jsでは、GPGPUはリアルタイムシミュレーション、パーティクルシステム、物理演算でよく使われ、テクスチャにデータを保存・更新することで、CPUに依存しない計算を可能にします。
この技術により、シェーダーがメモリと計算機能を持ち、複雑な計算を実行し、その結果をCPUの介入なしにテクスチャに保存できるようになります。
これにより、GPU上での大規模な計算が非常に効率的に行われます。
TSLのおかげで、GPGPUシミュレーションを作成するプロセスははるかに簡単で直感的になります。ストレージとバッファノードを計算関数と組み合わせることで、最小限のコードで複雑なシミュレーションを作成できます。
GPGPUが利用できるプロジェクトのアイデアをいくつか紹介します:
- パーティクルシステム
- 流体シミュレーション
- 物理シミュレーション
- ボイドシミュレーション
- 画像処理
さあ、理論から実践へ移りましょう!TSLとWebGPUを使用してGPGPUパーティクルシステムを作成しましょう。
パーティクルシステム
スターターパックは、WebGPU/TSLレッスン の実装に基づいたWebGPU対応のテンプレートです。
ピンクのmeshを、GPGPUParticlesという新しいコンポーネントで置き換えてみましょう。src/componentsフォルダにGPGPUParticles.jsxという名前の新しいファイルを作成し、次のコードを追加してください:
import { extend } from "@react-three/fiber"; import { useMemo } from "react"; import { color, uniform } from "three/tsl"; import { AdditiveBlending, SpriteNodeMaterial } from "three/webgpu"; export const GPGPUParticles = ({ nbParticles = 1000 }) => { const { nodes, uniforms } = useMemo(() => { // uniforms const uniforms = { color: uniform(color("white")), }; return { uniforms, nodes: { colorNode: uniforms.color, }, }; }, []); return ( <> <sprite count={nbParticles}> <spriteNodeMaterial {...nodes} transparent depthWrite={false} blending={AdditiveBlending} /> </sprite> </> ); }; extend({ SpriteNodeMaterial });
ここでは何も新しいことをしていません。パーティクルをレンダリングするために、SpriteとSpriteNodeMaterialを使用するGPGPUParticlesコンポーネントを作成しています。
SpriteをInstancedMeshの代わりに使用する利点は、軽量で、デフォルトでビルボード効果を持っていることです。
ExperienceコンポーネントにGPGPUParticlesコンポーネントを追加してみましょう:
import { OrbitControls } from "@react-three/drei"; import { GPGPUParticles } from "./GPGPUParticles"; export const Experience = () => { return ( <> {/* <Environment preset="warehouse" /> */} <OrbitControls /> <GPGPUParticles /> {/* <mesh> <boxGeometry /> <meshStandardMaterial color="hotpink" /> </mesh> */} </> ); };
meshとenvironmentコンポーネントを取り除くことができます。
![]()
画面の中央に四角形が見えます。これが、すべて同じ位置にある白いスプライトのパーティクルです。
パーティクルシステムを設定する時が来ました!
バッファ / ストレージ / インスタンス化配列
私たちのGPGPUシミュレーションでは、パーティクルがそのposition、velocity、age、およびcolorをCPUを使用せずに記憶する必要があります。
いくつかの要素はデータの保存を必要としません。colorはageとuniformsを組み合わせて計算することができます。また、velocityは固定のseed値を使用してランダムに生成することができます。
しかし、positionについては、ターゲット位置が変化する可能性があるため、bufferに保存する必要があります。ageについても、GPU内でパーティクルのライフサイクルを管理したいので同様です。
GPUにデータを保存するためには、storage nodeを使用することができます。これにより、GPU上で更新可能な大量の構造化データを保存することができます。
最小限のコードで使用するために、storage nodeに依存するInstancedArray TSL関数を使用します。
Three.js nodesのこの部分はまだドキュメント化されていません。例やソースコードを掘り下げることで、その動作を理解することができます。
では、useMemo内でシェーダーノードを配置する場所でバッファを準備しましょう。
// ... import { instancedArray } from "three/tsl"; export const GPGPUParticles = ({ nbParticles = 1000 }) => { const { nodes, uniforms } = useMemo(() => { // uniforms const uniforms = { color: uniform(color("white")), }; // buffers const spawnPositionsBuffer = instancedArray(nbParticles, "vec3"); const offsetPositionsBuffer = instancedArray(nbParticles, "vec3"); const agesBuffer = instancedArray(nbParticles, "float"); return { uniforms, nodes: { colorNode: uniforms.color, }, }; }, []); // ... }; // ...
instancedArrayは、指定されたサイズとタイプのバッファを作成するTSL関数です。
同様のコードをstorage nodeを使用して記述すると次のようになります。
import { storage } from "three/tsl"; import { StorageInstancedBufferAttribute } from "three/webgpu"; const spawnPositionsBuffer = storage( new StorageInstancedBufferAttribute(nbParticles, 3), "vec3", nbParticles );
これらのバッファを使用して、それぞれのパーティクルのpositionとageを保存し、GPU内でそれらを更新することができます。
バッファ内のデータにアクセスするには、.element(index)を使用して指定されたインデックスの値を取得できます。
私たちの場合、それぞれのパーティクルのinstanceIndexを使用してバッファ内のデータにアクセスします。
// ... import { instanceIndex } from "three/tsl"; export const GPGPUParticles = ({ nbParticles = 1000 }) => { const { nodes, uniforms } = useMemo(() => { // ... // buffers const spawnPositionsBuffer = instancedArray(nbParticles, "vec3"); const offsetPositionsBuffer = instancedArray(nbParticles, "vec3"); const agesBuffer = instancedArray(nbParticles, "float"); const spawnPosition = spawnPositionsBuffer.element(instanceIndex); const offsetPosition = offsetPositionsBuffer.element(instanceIndex); const age = agesBuffer.element(instanceIndex); return { uniforms, nodes: { colorNode: uniforms.color, }, }; }, []); // ... }; // ...
instanceIndexは、処理中の現在のインスタンスのインデックスを返す組み込みのTSL関数です。
これにより、各パーティクルのバッファ内のデータにアクセスすることができます。
このプロジェクトでは必要ありませんが、他のインスタンスのデータにアクセスできることで、パーティクル間に複雑な相互作用を生み出すことができます。例えば、互いに追いかけ合う鳥の群れを作ることも可能です。
初期コンピュート
パーティクルの位置と年齢を設定するには、シミュレーションの開始時にGPU上で実行されるcompute関数を作成する必要があります。
TSLでコンピュート関数を作成するには、Fnノードを使用して呼び出し、パーティクル数を指定してcomputeメソッドを使います:
// ... import { Fn } from "three/src/nodes/TSL.js"; export const GPGPUParticles = ({ nbParticles = 1000 }) => { const { nodes, uniforms } = useMemo(() => { // ... const spawnPosition = spawnPositionsBuffer.element(instanceIndex); const offsetPosition = offsetPositionsBuffer.element(instanceIndex); const age = agesBuffer.element(instanceIndex); // init Fn const lifetime = randValue({ min: 0.1, max: 6, seed: 13 }); const computeInit = Fn(() => { spawnPosition.assign( vec3( randValue({ min: -3, max: 3, seed: 0 }), randValue({ min: -3, max: 3, seed: 1 }), randValue({ min: -3, max: 3, seed: 2 }) ) ); offsetPosition.assign(0); age.assign(randValue({ min: 0, max: lifetime, seed: 11 })); })().compute(nbParticles); // ... }, []); // ... }; // ...
ランダムな値でバッファを指定するcomputeInit関数を作成しました。
randValue関数は存在しないので、自分で作成する必要があります。
利用可能な関数は以下の通りです:
hash(seed): シードに基づいて0から1の間のランダムな値を生成します。range(min, max): 最小値と最大値の間でランダムな値を生成します。
詳細はThree.js Shading Language Wikiを確認してください。
しかし、range関数は属性を定義し、その値を保存します。これは私たちが望むものではありません。
シードに基づいて最小値と最大値の間のランダムな値を返すrandValue関数を作成しましょう:
import { hash } from "three/tsl"; const randValue = /*#__PURE__*/ Fn(({ min, max, seed = 42 }) => { return hash(instanceIndex.add(seed)).mul(max.sub(min)).add(min); }); export const GPGPUParticles = ({ nbParticles = 1000 }) => { // ... }; // ...
randValue関数はmin、max、seedを取り、シードに基づいて最小値と最大値の間のランダムな値を返します。
/*#__PURE__*/はツリーシェイキングのためのコメントです。この関数が使用されない場合、バンドラーにより削除されることを示します。詳細はこちらを参照してください。
次にcomputeInit関数を呼び出します。これはrendererの仕事です。useThreeを使ってインポートし、その宣言の直後に呼び出します:
// ... import { useThree } from "@react-three/fiber"; export const GPGPUParticles = ({ nbParticles = 1000 }) => { const gl = useThree((state) => state.gl); const { nodes, uniforms } = useMemo(() => { // ... const computeInit = Fn(() => { // ... })().compute(nbParticles); gl.computeAsync(computeInit); // ... }, []); // ... }; // ...
可視化するためには、SpriteNodeMaterialのpositionNodeをspawnPositionとoffsetPositionバッファを使用して変更する必要があります。
// ... export const GPGPUParticles = ({ nbParticles = 1000 }) => { // ... const { nodes, uniforms } = useMemo(() => { // ... return { uniforms, nodes: { positionNode: spawnPosition.add(offsetPosition), colorNode: uniforms.color, }, }; }, []); // ... }; // ...
positionNodeをspawnPositionとoffsetPositionベクトルの合計に設定します。
うまく動作するでしょうか?確認してみましょう!

メーデー!全てが白い! ⬜️
少しズームアウトしてみては?
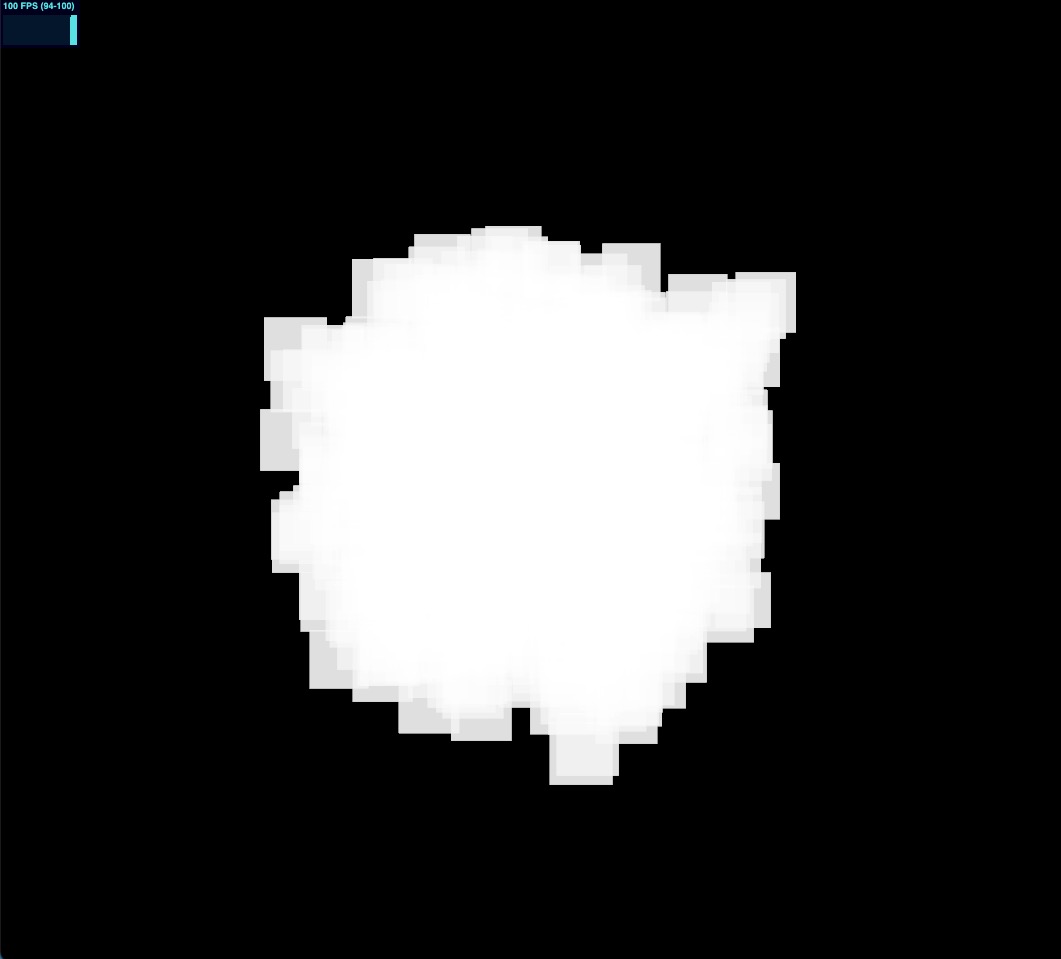
ふぅ、粒子が見えます。大きすぎて画面全体を覆っただけです! 😮💨
scaleNodeにランダムな値を設定して修正しましょう:
// ... import { range } from "three/tsl"; // ... export const GPGPUParticles = ({ nbParticles = 1000 }) => { // ... const { nodes, uniforms } = useMemo(() => { // ... const scale = vec3(range(0.001, 0.01)); return { uniforms, nodes: { positionNode: spawnPosition.add(offsetPosition), colorNode: uniforms.color, scaleNode: scale, }, }; }, []); return ( <> <sprite count={nbParticles}> <spriteNodeMaterial {...nodes} transparent depthWrite={false} blending={AdditiveBlending} /> </sprite> </> ); }; // ...
このシナリオでは、range関数を使用して0.001から0.01の間でランダムな値を生成できます。
完璧です。異なるサイズと位置にある粒子ができました! 🎉
ただ少し静的なので、動きを追加する必要があります。
コンピュートの更新
初期化コンピュート関数を作成したように、各フレームで実行されるコンピュートの更新関数を作成しましょう。
この関数では、パーティクルの位置と年齢を更新します。
// ... import { deltaTime, If } from "three/tsl"; export const GPGPUParticles = ({ nbParticles = 1000 }) => { // ... const { nodes, uniforms } = useMemo(() => { // ... const instanceSpeed = randValue({ min: 0.01, max: 0.05, seed: 12 }); // update Fn const computeUpdate = Fn(() => { age.addAssign(deltaTime); If(age.greaterThan(lifetime), () => { age.assign(0); offsetPosition.assign(0); }); offsetPosition.addAssign(vec3(instanceSpeed)); })().compute(nbParticles); // ... }, []); // ... }; // ...
React Three Fiber: The Ultimate Guide to 3D Web Development
✨ You have reached the end of the preview ✨
Go to the next level with Three.js and React Three Fiber!
Get full access to this lesson and the complete course when you enroll:
- 🔓 Full lesson videos with no limits
- 💻 Access to the final source code
- 🎓 Course progress tracking & completion
- 💬 Invite to our private Discord community
One-time payment. Lifetime updates included.