HTML
到目前为止,我们构建的 3D 体验 仅包含一个 canvas HTML 元素,我们的 Three.js 3D 场景 就在其中被渲染。
有两种方法可以使我们的体验更具 互动性:
- 像往常一样构建您的 HTML 页面,并以 全屏 canvas 的形式背景添加您的 3D 场景。然后通过 鼠标事件 或 页面滚动 将其与页面内容很好地结合起来。在 动画课程 中的 滚动部分 我们将看到如何实现这一点。
- 添加 HTML 元素,就像它们是我们 3D 场景 中的 3D 对象 一样。这就是我们将在本课中看到的内容。
这两种方法并不相互排斥。您可以结合它们创建 沉浸式体验。
Ikea 在线展厅
在本课中,我们假设想要为 Ikea 创建一个 在线展厅。起始包中包含各种 厨房家具 的 3D 模型(全部来自 Quaternius on Poly Pizza,感谢 🙏)。
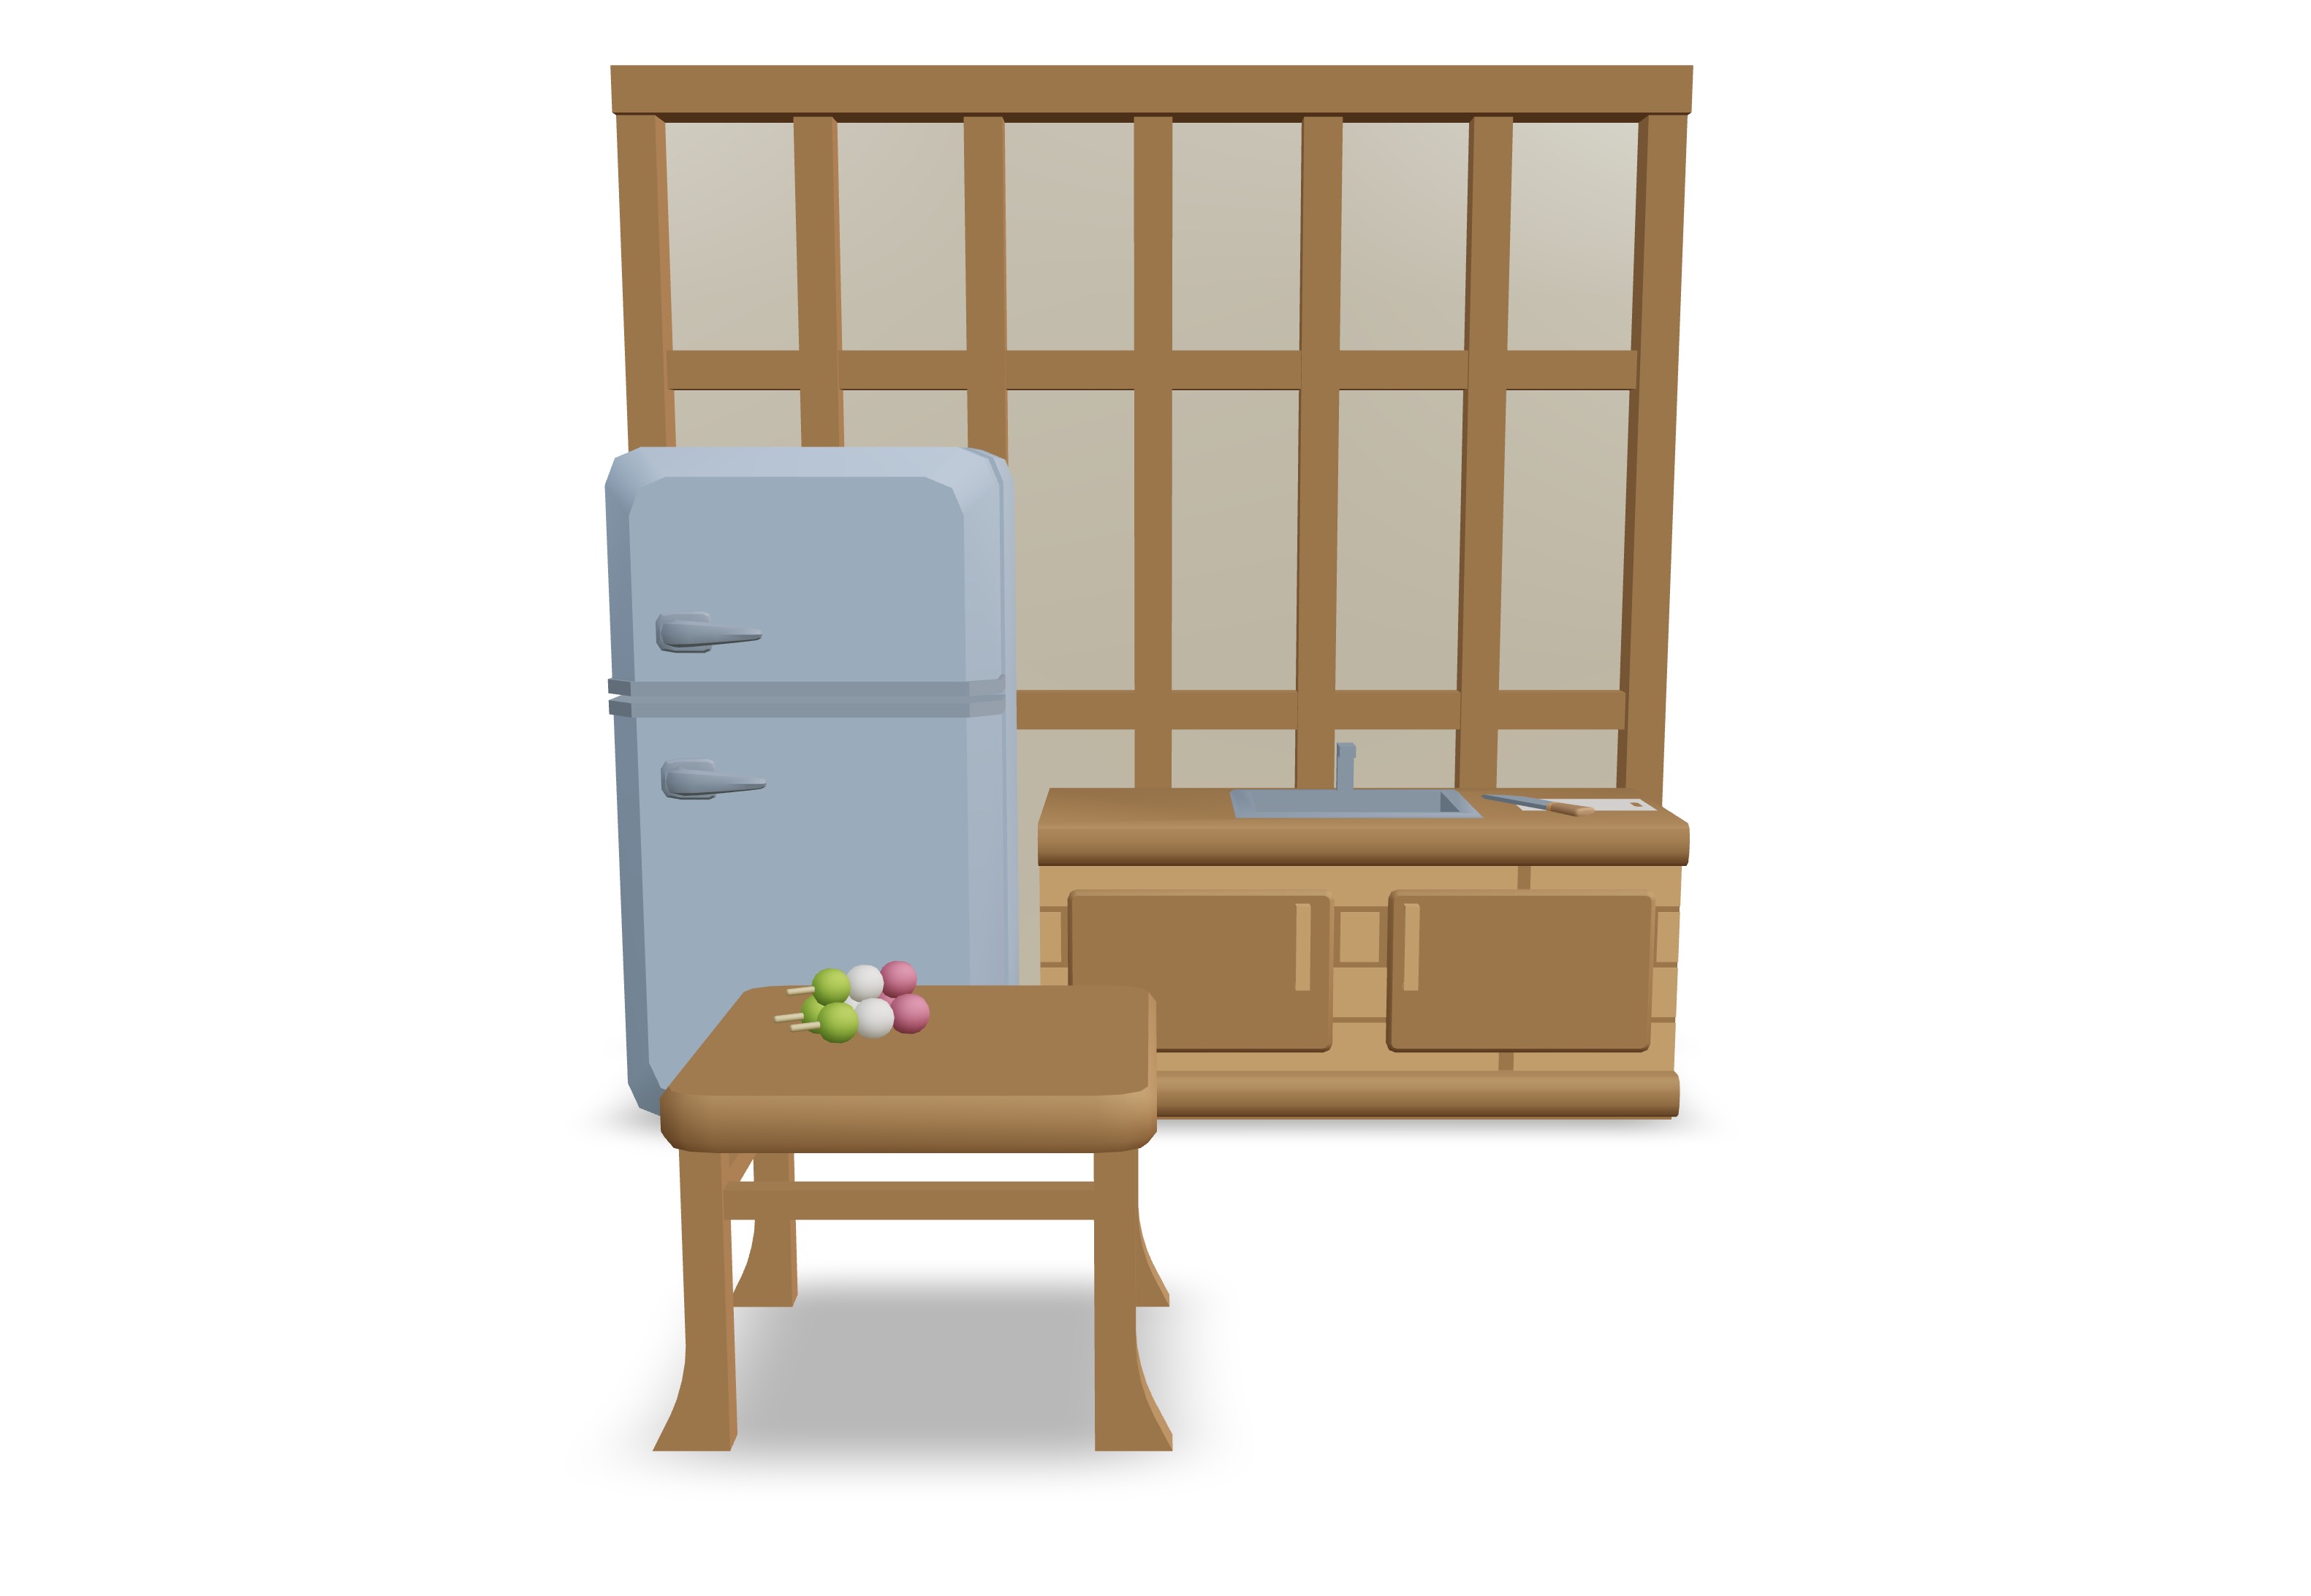
这是我们目前拥有的。日式风格的厨房。
我们将尝试在 厨房家具 上添加标签以显示每个物品的 名称 和 价格。
在执行此操作之前,让我解释一些关于 起始包 的内容。
为了使代码更 通用,我没有手动声明每个项目并重写加载和定位逻辑,而是创建了一个 items 数组。
const sceneItems = [ { model: "Japanese Door.glb", position: [0, -0.88, -1.2], scale: 1.8, }, { model: "Counter Sink.glb", position: [1.3, 0, -2.8], }, { model: "Chopping board.glb", position: [2.8, 1.9, -2.8], scale: 0.5, }, { model: "Fridge.glb", position: [-2.1, 0, -3], }, { model: "Table.glb", position: [-1, 0, 2], scale: [1, 1, 1], }, { model: "Dango.glb", position: [-1.4, 1.64, 2], scale: 0.72, rotation: [0, Math.PI / 6, 0], }, ];
然后,我创建了一个名为 Item 的 通用组件,它接收 model path 和其他 transform props (position, rotation, scale...):
const Item = ({ model, position, rotation, ...props }) => { const gltf = useGLTF(`models/${model}`); return ( <group position={position} rotation={rotation}> <primitive object={gltf.scene} {...props} /> </group> ); };
该组件负责加载 3D 模型 并在场景中 定位 它。我选择 group 作为根元素,以便稍后可以将 HTML 元素 作为子元素添加。
然后我们遍历 items 数组,为每个项目渲染一个 Item 组件:
export const Experience = () => { return ( <> {sceneItems.map((item, index) => { return <Item key={index} {...item} />; })} </> ); };
在 3D 中嵌入 HTML 元素
既然我们有了一个可以渲染任何3D 模型并将其定位于场景中的通用组件,我们现在可以把注意力转向我们的家具标签。
让我们通过添加 label 和 price 属性,向我们的items 数组添加更多信息:
const sceneItems = [ { model: "Japanese Door.glb", position: [0, -0.88, -1.2], scale: 1.8, name: "Hemnes", price: 300, }, { model: "Counter Sink.glb", position: [1.3, 0, -2.8], name: "Lillången", price: 450, }, { model: "Chopping board.glb", position: [2.8, 1.9, -2.8], scale: 0.5, name: "Skogsta", price: 25, }, { model: "Fridge.glb", position: [-2.1, 0, -3], name: "Lagan", price: 600, }, { model: "Table.glb", position: [-1, 0, 2], scale: [1, 1, 1], name: "Lerhamn", price: 80, }, { model: "Dango.glb", position: [-1.4, 1.64, 2], scale: 0.72, rotation: [0, Math.PI / 6, 0], name: "Dango", price: 4, }, ];
不要介意这些名字和价格,它们是由 GitHub Copilot 生成的......
现在,我们可以更新我们的 Item 组件以获取 name 和 price 属性,并将其作为 HTML 元素 渲染:
const Item = ({ model, position, rotation, name, price, ...props }) => { const gltf = useGLTF(`models/${model}`); return ( <group position={position} rotation={rotation}> <primitive object={gltf.scene} {...props} /> <Html> <div className="label"> <div className="label__price">${price}</div> <div className="label__name">{name}</div> </div> </Html> </group> ); };
<Html/> 组件是一个 wrapper,允许我们在3D 场景中渲染 HTML 元素。它由 Drei 提供,并附带许多有用的功能,这些功能用 vanilla Three.js 实现起来会更费时。
例如,occlusion 属性(即 HTML 元素 被隐藏在 3D 模型 后面)就是通过 <Html/> 组件使用 raycasting 来自动处理的。
在探索其功能之前,让我们进行一些 CSS 样式设置,使我们的标签看起来更好。你可以使用任何你喜欢的 CSS 框架,我个人非常喜欢 Tailwind CSS,但为了保持简单和通用,本文将直接在 index.css 文件中编写 CSS:
.label { padding: 0.5rem 1.5rem; background-color: rgb(255 255 255 / 80%); border-radius: 0.5rem; box-shadow: 0 0 0.5rem rgba(0, 0, 0, 0.2); pointer-events: none; text-align: center; } .label__price { font-size: 2rem; font-weight: bold; } .label__name { font-size: 1rem; color: #999; }
我还从 Google Fonts 添加了 Inter font
@import url("https://fonts.googleapis.com/css2?family=Inter:wght@400;700"); #root { width: 100vw; height: 100vh; } body { margin: 0; font-family: "Inter", sans-serif; }
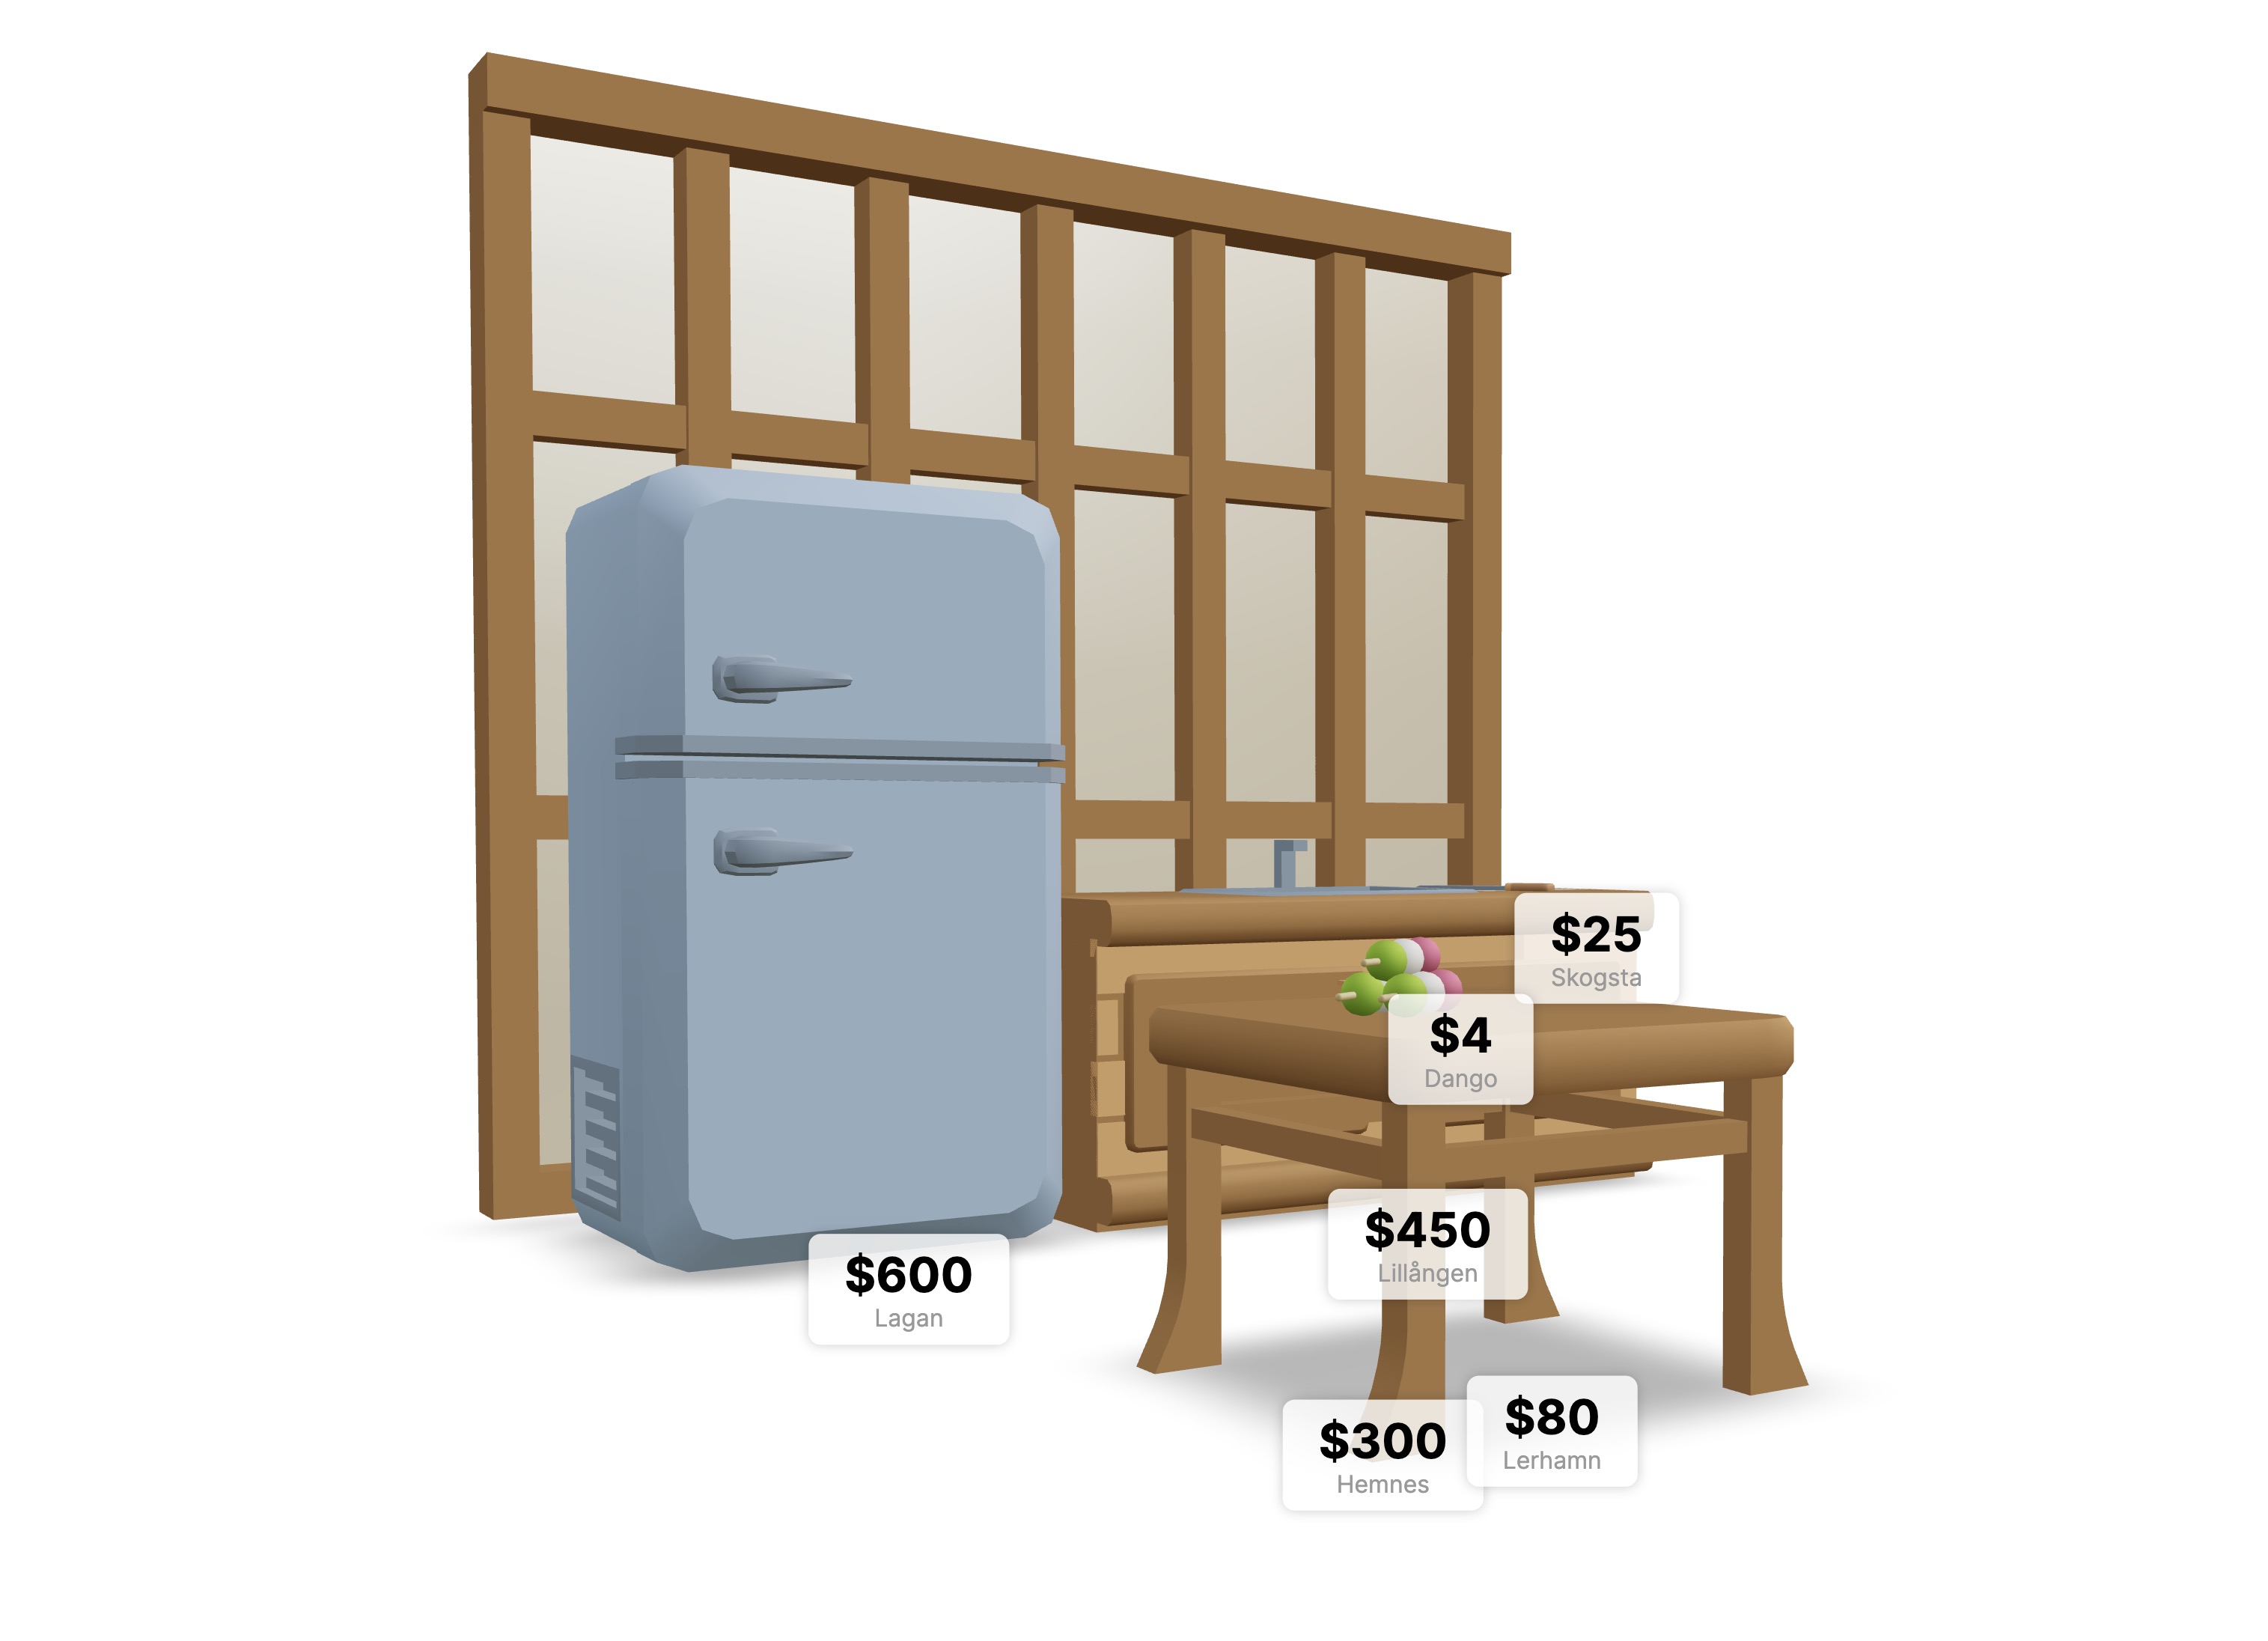
现在我们可以在场景中看到我们的标签了
为了防止在使用 OrbitControls 时文本被选中,我们可以将 noselect 类添加到标签中:
<Html> <div className="label noselect"> <div className="label__price">${price}</div> <div className="label__name">{name}</div> </div> </Html>
并在 index.css 文件中添加以下 CSS:
.noselect { -webkit-touch-callout: none; /* iOS Safari */ -webkit-user-select: none; /* Safari */ -khtml-user-select: none; /* Konqueror HTML */ -moz-user-select: none; /* Firefox 旧版 */ -ms-user-select: none; /* Internet Explorer/Edge */ user-select: none; /* 非前缀版本,目前由 Chrome、Edge、Opera 和 Firefox 支持 */ }
我在每个项目中都从这个 StackOverflow 上复制/粘贴了多年的代码!
虽然这已经是一个很好的开始,但我们还可以做得更好。让我们探索 <Html/> 组件提供的一些功能。
遮挡
为了使我们的标签在位于其他对象后面时消失,我们可以使用 occlude 属性:
<Html occlude> <div className="label"> <div className="label__price">${price}</div> <div className="label__name">{name}</div> </div> </Html>
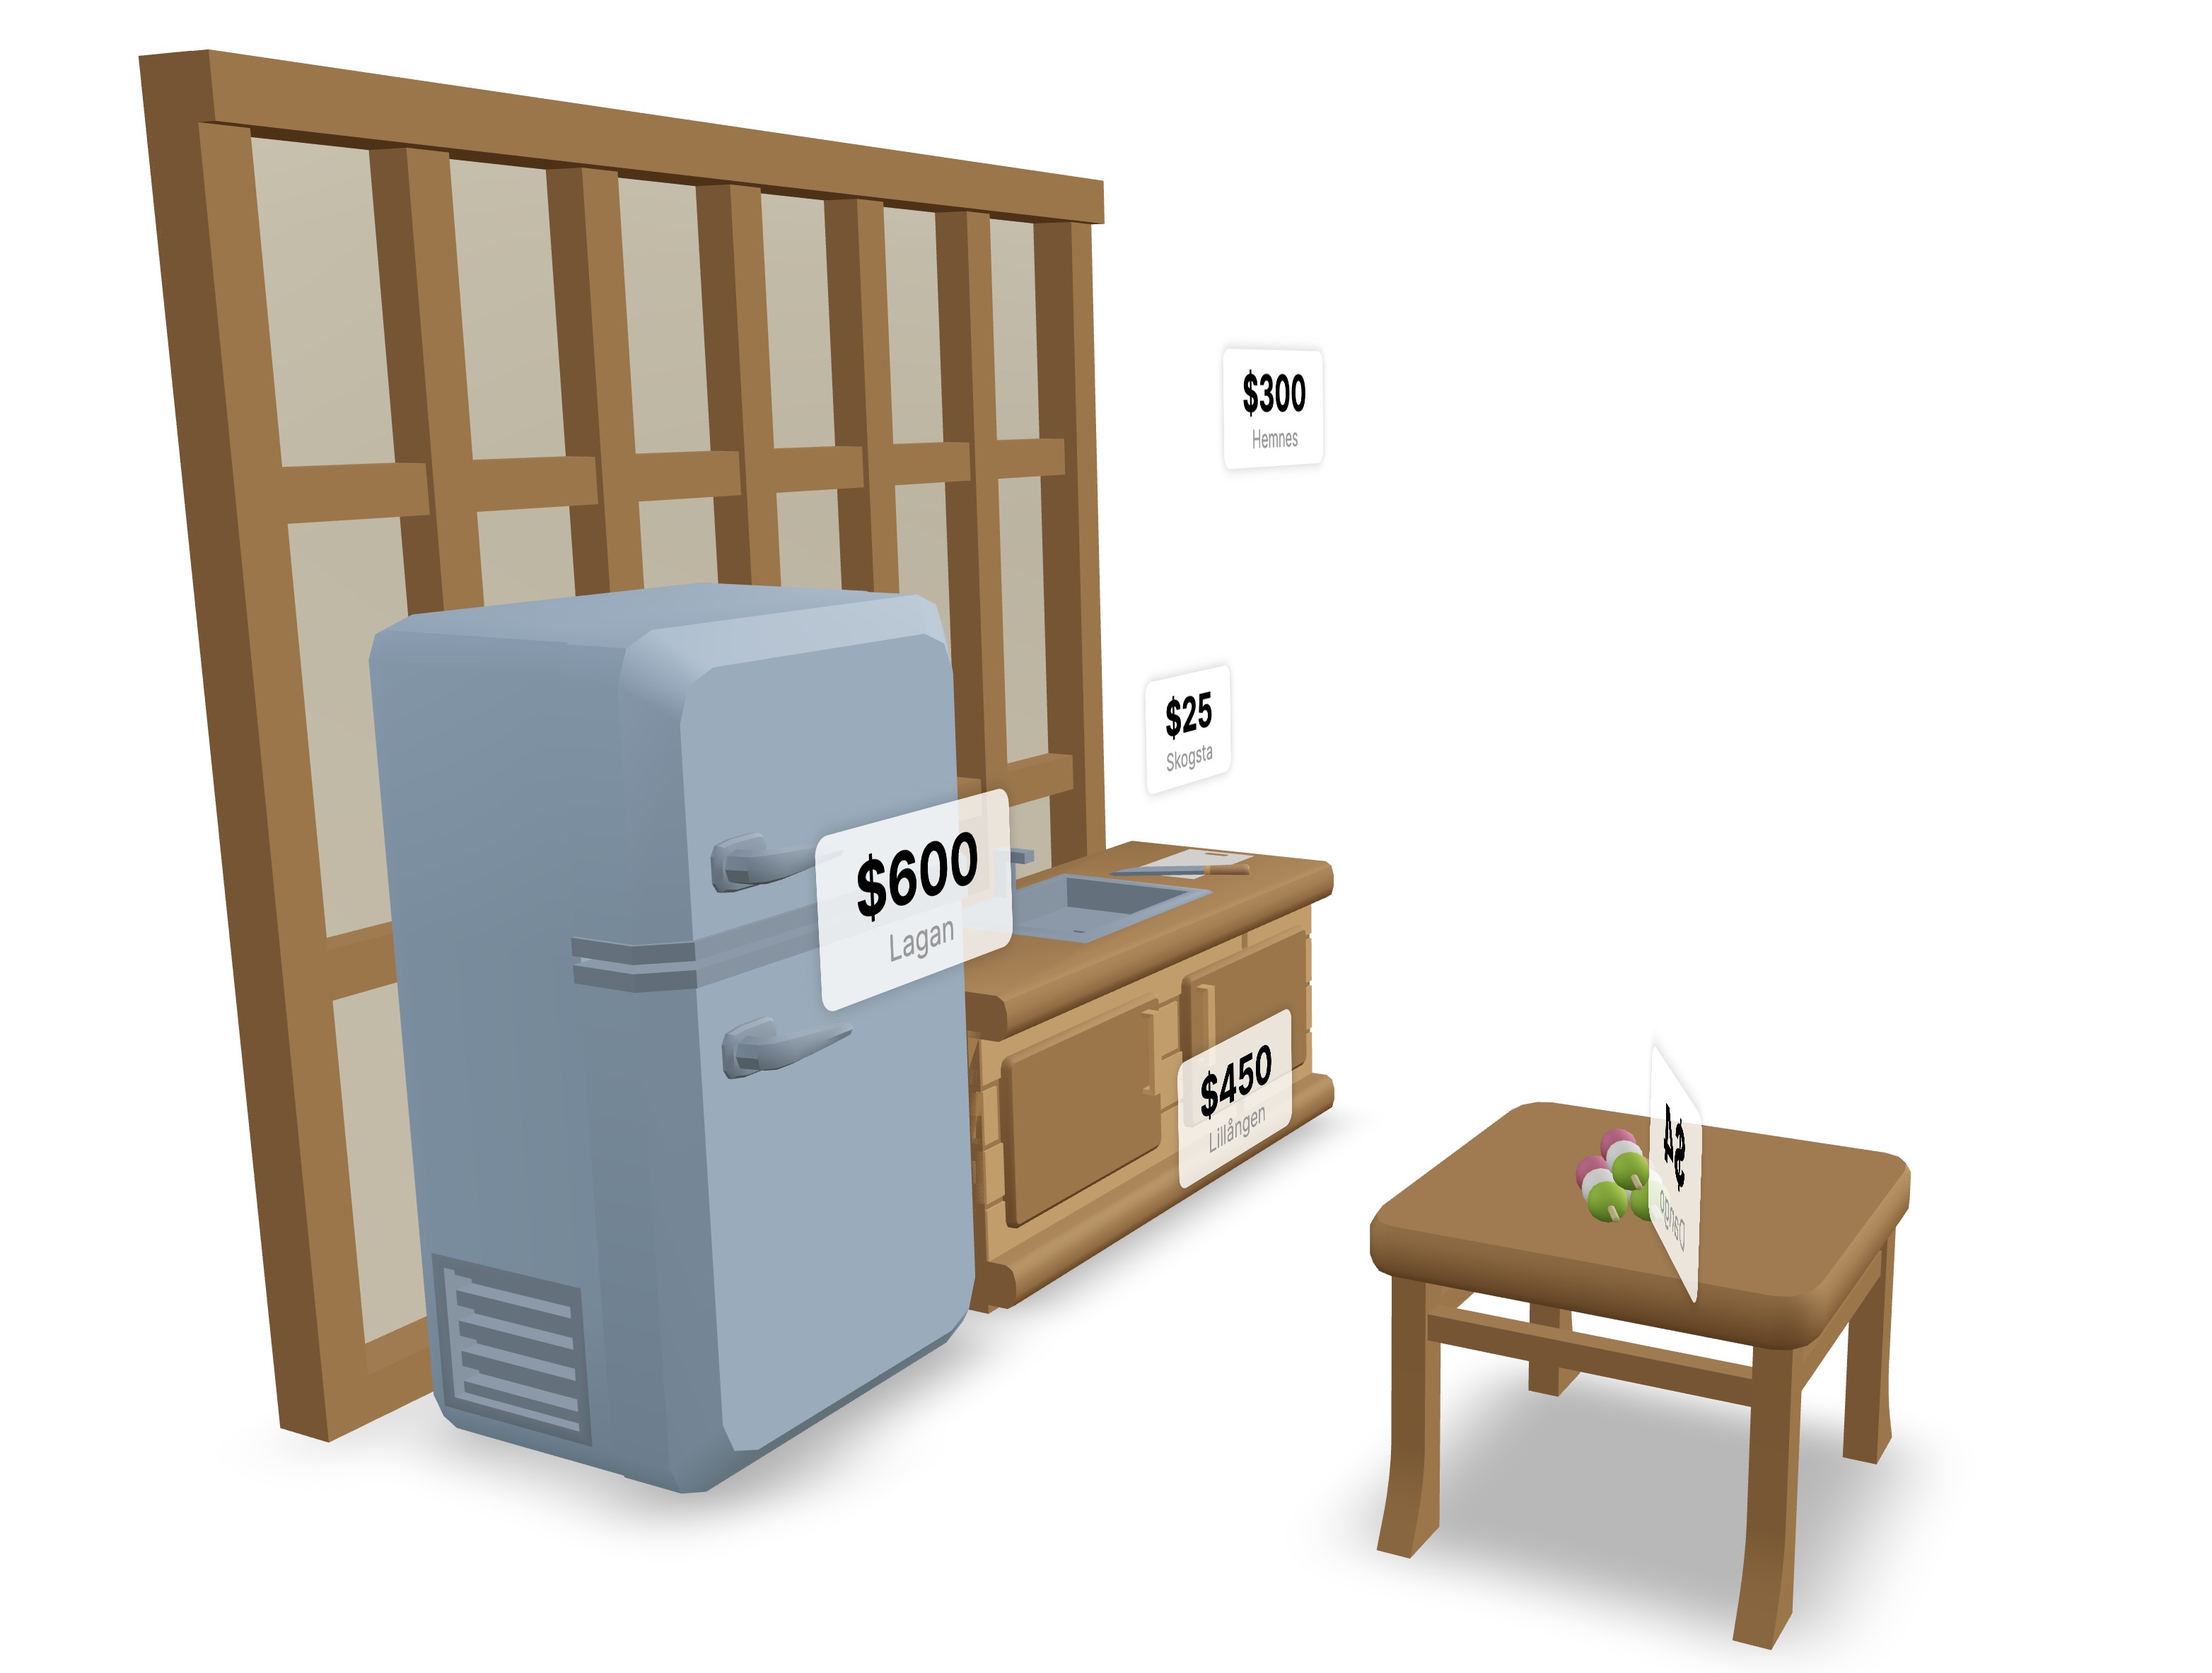
但是现在我们无法再看到它们(有些在闪烁)...
这是因为它们的当前位置设置为 0, 0, 0,因此被附加的对象遮住了。
为了解决这个问题,我们可以为 sceneItems 添加一个 labelOffset 属性:
const sceneItems = [ { model: "Japanese Door.glb", position: [0, -0.88, -1.2], scale: 1.8, name: "Hemnes", price: 300, labelOffset: [3, 6, -1], }, { model: "Counter Sink.glb", position: [1.3, 0, -2.8], name: "Lillången", price: 450, labelOffset: [-0.5, 1, 1.5], }, { model: "Chopping board.glb", position: [2.8, 1.9, -2.8], scale: 0.5, name: "Skogsta", price: 25, labelOffset: [0, 1, 0], }, { model: "Fridge.glb", position: [-2.1, 0, -3], name: "Lagan", price: 600, labelOffset: [-0.5, 3, 2], }, { model: "Table.glb", position: [-1, 0, 2], scale: [1, 1, 1], name: "Lerhamn", price: 80, labelOffset: [1, 1, 0], }, { model: "Dango.glb", position: [-1.4, 1.64, 2], scale: 0.72, rotation: [0, Math.PI / 6, 0], name: "Dango", price: 4, labelOffset: [-1, 0.5, 0], }, ];
并更新我们的 Item 组件以使用它:
const Item = ({ model, position, rotation, name, price, labelOffset, ...props }) => { const gltf = useGLTF(`models/${model}`); return ( <group position={position} rotation={rotation}> <primitive object={gltf.scene} {...props} /> <Html occlude position={labelOffset}> <div className="label noselect"> <div className="label__price">${price}</div> <div className="label__name">{name}</div> </div> </Html> </group> ); };
注意: 如果你想知道我是如何找到合适的偏移量的,我是通过尝试不同的值直到对结果满意。
附注: 我后悔用了这些宜家风格的名字...
这看起来不错,价格甚至可以通过日本门的孔显示和消失!
但这个效果有点生硬,让我们添加一些 CSS 过渡效果让它更平滑。为此,我们需要:
- 创建一个
state来判断标签是否hidden: - 将
setHidden函数传递给<Html/>组件的onOcclude属性 - 有条件地向标签添加
label--hidden类
const Item = ({ model, position, rotation, name, price, labelOffset, ...props }) => { const gltf = useGLTF(`models/${model}`); const [hidden, setHidden] = useState(false); return ( <group position={position} rotation={rotation}> <primitive object={gltf.scene} {...props} /> <Html occlude onOcclude={setHidden} position={labelOffset}> <div className={`label noselect ${hidden ? "label--hidden" : ""}`}> <div className="label__price">${price}</div> <div className="label__name">{name}</div> </div> </Html> </group> ); };
现在在 index.css 文件中,我们可以添加我们选择的过渡效果:
.label { padding: 0.5rem 1.5rem; background-color: rgb(255 255 255 / 80%); border-radius: 0.5rem; box-shadow: 0 0 0.5rem rgba(0, 0, 0, 0.2); pointer-events: none; text-align: center; transition: transform 0.2s, opacity 0.42s; } .label--hidden { opacity: 0; transform: scale(0.42); }
好多了!
Transform
当前文本总是面对摄像机,但我们可以通过在 <Html/> 组件中添加 transform 属性来改变这一点:
<Html transform occlude onOcclude={setHidden} position={labelOffset} >
这样可以让文本看起来像是场景的一部分,但并不是从每个角度都可读,这取决于具体的使用场景。
让我们保留它,但由于文本有点太大,我们可以稍微缩小它:
<Html transform occlude onOcclude={setHidden} position={labelOffset} scale={0.42} >
结论
我们已经看到了如何使用 <Html/> 组件来向场景添加 HTML 元素,以及如何使用 occlude 属性根据摄像机位置使它们出现和消失。
如果您想了解更多关于 <Html/> 组件及其其他属性的信息,可以查看 Drei 文档。
React Three Fiber: The Ultimate Guide to 3D Web Development
✨ You have reached the end of the preview ✨
Go to the next level with Three.js and React Three Fiber!
Get full access to this lesson and the complete course when you enroll:
- 🔓 Full lesson videos with no limits
- 💻 Access to the final source code
- 🎓 Course progress tracking & completion
- 💬 Invite to our private Discord community
One-time payment. Lifetime updates included.