Facial Expressions
The facial expression system provides dynamic, context-aware facial animations that respond to speech, emotions, and conversation states.
It uses a Finite State Machine (FSM) to orchestrate complex facial behaviors including lip-sync, emotional expressions, and micro-expressions.
System Overview
The facial expression system works through three main components:
- Viseme System: Handles lip-sync and speech animations
- Facial Expressions: Manages facial expressions based on emotions and context
- Face Animations: The finite state machine managing expression states and transitions
Viseme System (Lip-Sync)
Visemes are mouth shapes corresponding to phonemes in speech. The system maps audio analysis or text-to-speech phonemes to facial morph targets.
The AI Engine takes care of phoneme extraction from TTS audio with wawa-lipsync library and the FSM triggers the appropriate visemes.
Thanks to the realtime audio analysis, the lip-sync process works with any TTS engine.
For TTS engines that provide phoneme timing (like Azure TTS), you can directly feed the phoneme data to the FSM for more accurate lip-sync.
The avatar model must include morph targets for the visemes. By default, Chatbot Kit uses the OVRLipSync viseme set but you can customize the mapping.
Facial Expressions
Facial expressions are driven by emotional states and conversation context. The AI Engine detects emotions from the chat context and the FSM blends the corresponding facial expressions.
To create realistic expressions, the avatar model should include ARKit blend shapes. To easily create or convert models with ARKit blend shapes, consider using Faceit extension for Blender.
Default expressions are defined in /src/components/core/3d/FacialExpressions.js inside FacialExpressions object:
export const FacialExpressions = { default: { browDownLeft: 0, browDownRight: 0, browInnerUp: 0, browOuterUpLeft: 0, browOuterUpRight: 0, // ... }, smile: { // ... }, // ... };
It is a map of expression names to morph target values. You can customize these or add new expressions.
Creating Custom Emotions
To customize existing emotions or add new ones set setupManager to true in your SceneConfig.js:
export const SceneConfig = { scenario: "wellness-center", setupManager: true, // ... };
You will have access to facialExpressionBuilder inside the setup panel:
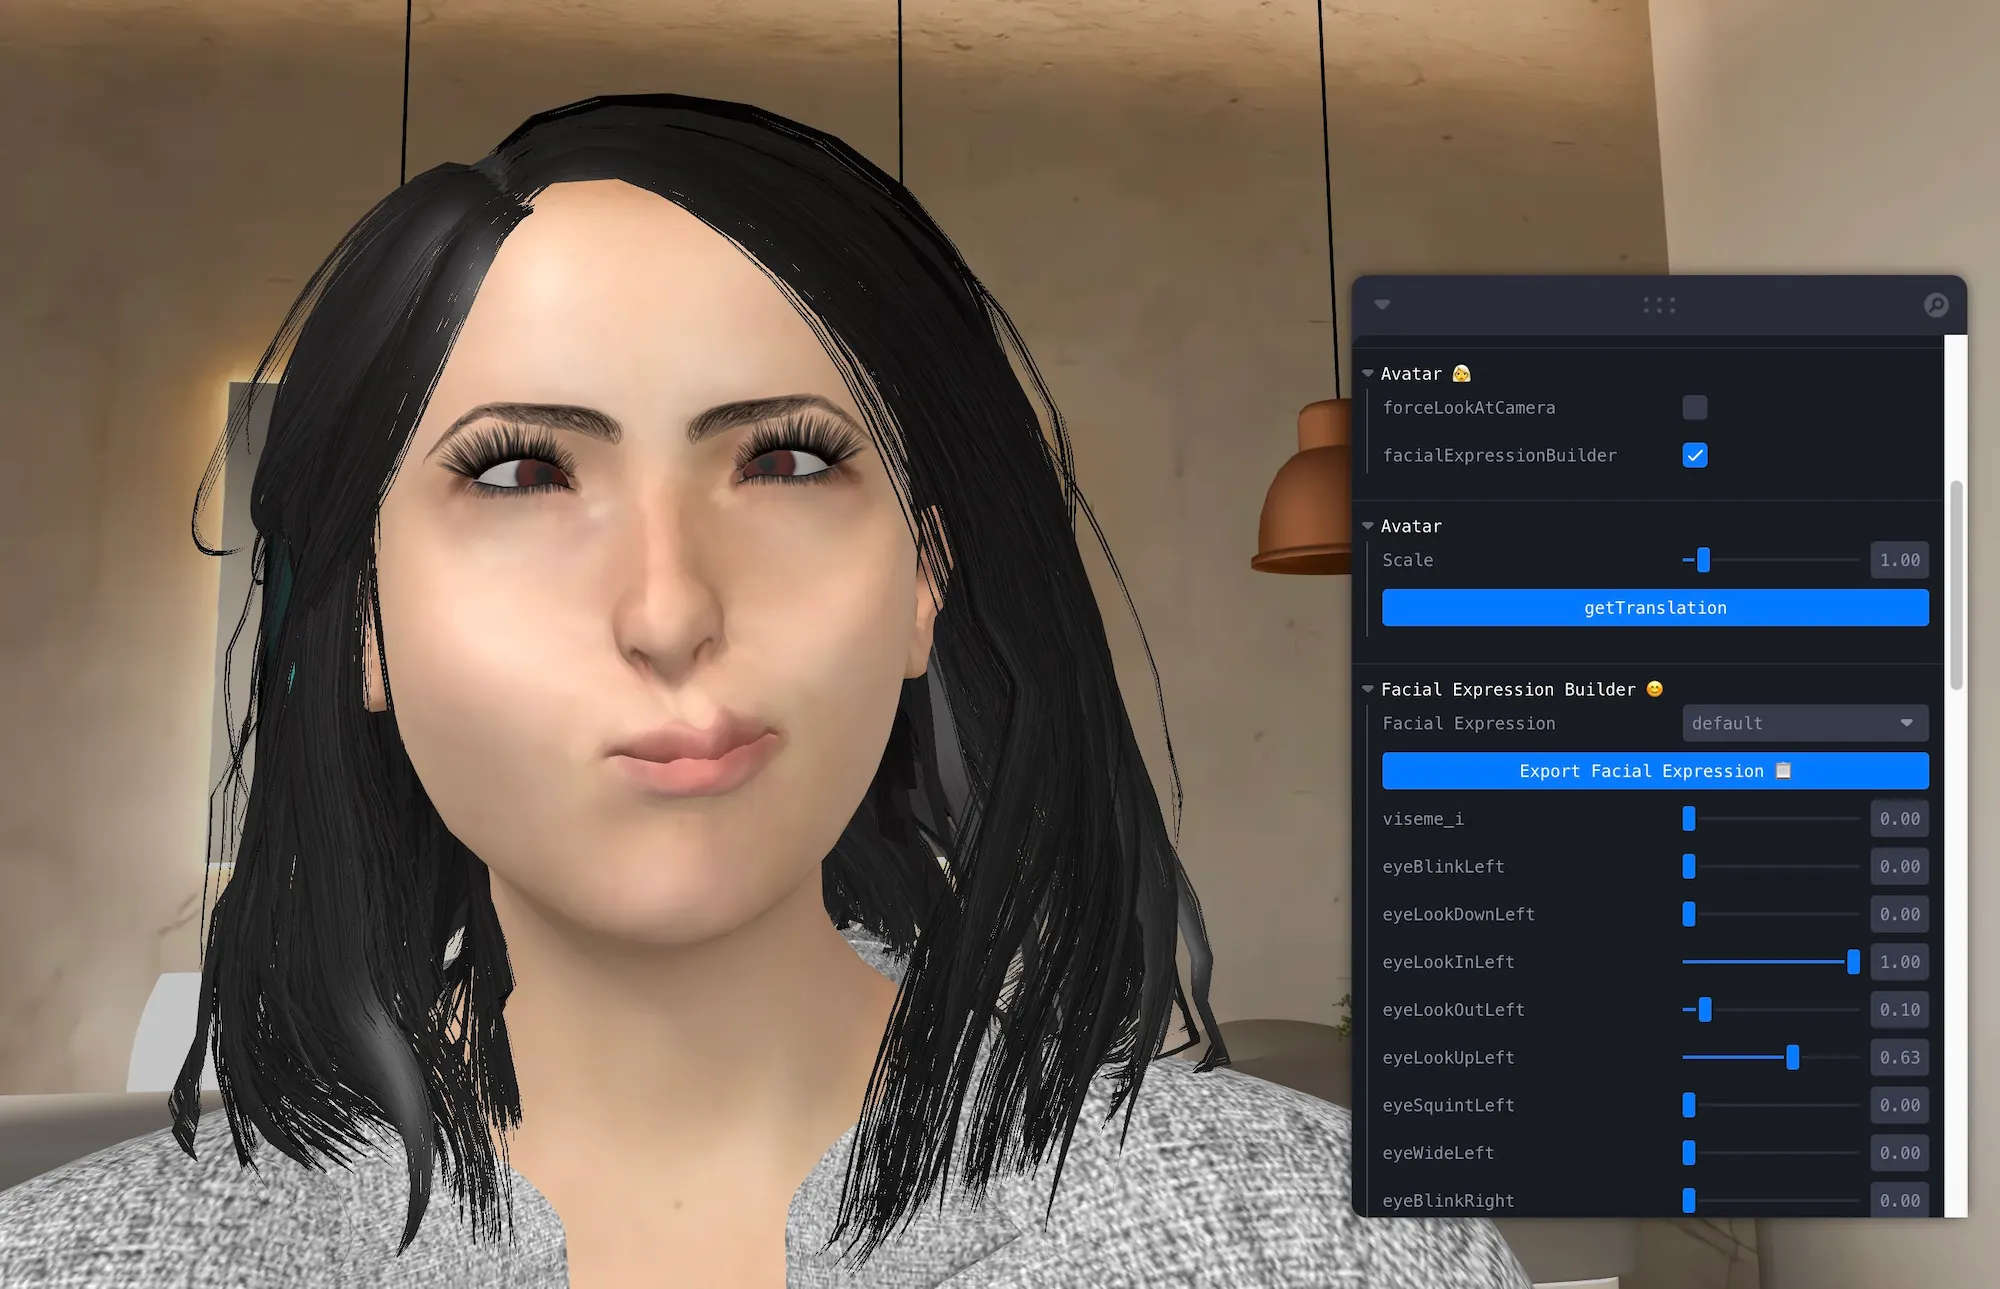
Setup panel to create and test facial expressions
In this mode, the expression displayed by the avatar can be controlled via the sliders. You can create new expressions by adjusting the sliders and saving them with a name.
The button Export Facial Expression will copy the definition to your clipboard, which you can then paste into your FacialExpressions object in FacialExpressions.js.
Face Animations
Face Animations is a finite state machine (FSM) that manages facial expression states, viseme display, and micro-expressions. It coordinates transitions between different facial states and ensures smooth, natural transitions between different expressions.
It is located in src/components/core/3d/avatar/FaceAnimations.js.
Mood and Facial Expression Set
The AI Engine sets the avatar's mood based on conversation context. The FSM uses this mood to select appropriate facial expressions based on the mood.
On mood can be associated with one or more facial expressions defined in the defaultFacialExpressionSet located in src/components/core/3d/FacialExpressions.js:
export const defaultFacialExpressionSet = { [AvatarMood.NEUTRAL]: [ { expression: "default", weight: 1 }, { expression: "thinking", weight: 0.3 }, { expression: "sleepy", weight: 0.2 }, ], [AvatarMood.HAPPY]: "smile", [AvatarMood.SAD]: "sad", [AvatarMood.SURPRISED]: "surprised", [AvatarMood.ANGRY]: "angry", [AvatarMood.CONFUSED]: "thinking", [AvatarMood.EXCITED]: "excited", };
The FSM randomly selects an expression from the set based on the defined weights. This allows for more varied and natural facial behavior.
Micro-Expressions
Micro-expressions add realism through subtle, brief facial movements. At the moment, they are defined in the FaceAnimations.js file inside the animations property object:
this.animations = { blinking: { initialState: "open", morphs: [ { name: "eyeBlinkLeft", intensityFactor: 1.0 }, { name: "eyeBlinkRight", intensityFactor: 1.0 }, { name: "browDownLeft", intensityFactor: 0.1 }, { name: "browDownRight", intensityFactor: 0.1 }, ], states: { open: { duration: { min: 3000, max: 12000 }, intensity: { min: 0, max: 0 }, transitionTime: { min: 80, max: 120 }, // Time to transition TO this state noise: { intensity: 0.02, speed: 0.0008 }, transitions: [{ state: "closed", weight: 1.0 }], }, closed: { duration: { min: 40, max: 80 }, intensity: { min: 1.0, max: 1.0 }, transitionTime: { min: 80, max: 120 }, // Time to close eyes noise: { intensity: 0.005, speed: 0.002 }, transitions: [{ state: "open", weight: 1.0 }], }, }, }, breathing: { // ... }, // ... };
With this approach, you can easily customize or add new micro-expressions by defining new states and morph targets.